Guide to Selecting the Right Sprinkler Type:
Which to use, sprays, rotary nozzles, or rotors? Here are some questions to guide your selection.
- Is your water pressure less than 40 PSI static? If so you should consider using sprays or rotary nozzles.
- Is the area long and narrow, between 12-28′ wide? Then you should look into rotary nozzles. They may also be appropriate for narrower areas, at the time I am writing this Hunter has introduced a “side-strip” rotator for 4 to 5 foot wide strips that are at least 12′ long. More combinations of widths will likely be introduced in coming years.
- Is the area you want to water greater than 30′ x 30′ in dimensions? If so, rotors may be the best solution.
- Is the edge of the area to be watered curved? If the edge has sharp curves (less than 20′ radius) then rotors with longer radii will have difficulty watering the edges without over-spraying them. This may not be an issue depending on what is beyond the edge. If the area beyond the edge should not get water on it you might want to consider a smaller rotary nozzle or spray-type sprinkler.
Installation Issues related to Sprinkler Selection:
Rotors and rotary nozzles are spaced farther apart than sprays. Therefore installation of them requires less pipe and trenching, but they also cost more per sprinkler. For most normal-size city residential yards spray heads or rotary nozzles are usually the better choice.
Cost Issues in Selecting Type of Sprinkler:
Surprisingly regardless of the type of sprinkler you use, the cost per square foot of area irrigated comes out about the same, assuming correct design of course. When using rotors or rotary nozzles there is less pipe and trenches, but the rotors themselves cost more. Spray heads are less expensive to buy, but they require more pipe, trenches and valves to install. In the end, the price really comes out pretty close either way.
If you are unsure, try using rotors in your design. If they don’t work out well, then erase them from your plan and try rotary nozzles. In many situations the best option maybe to use rotors in large areas, and spray heads or rotary nozzles in smaller or more narrow spaces. So you may have a mixture. This is OK, but there are some things you need to be careful of when mixing different types of sprinklers. The first is that each type must be separated and connected to a separate control valve. You can’t mix the types together on a single valve circuit or valve zone. More on this later in the tutorial. The second is determining how to space the heads where the different types meet each other. For example, if you have a 30′ radius rotor next to a 15′ radius spray head, how far apart should they be from each other? There are many different schools of thought on this, but my general recommendation is to split the difference. In this example put them 22′ apart. Yes, the rotor would overspray the spray head by a considerable distance. But if you put them 30′ apart you will get a distinct dry spot between them.
Basic Body Styles:
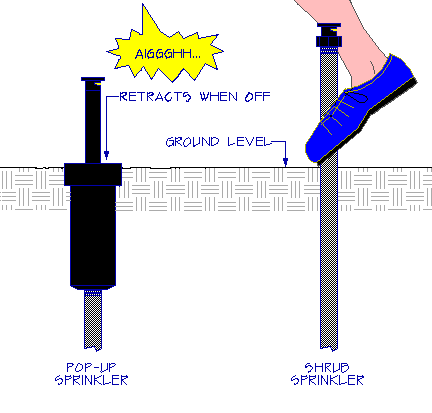
Pop-Up Style Sprinklers:
Pop-up style sprinklers are installed below ground. A piston that contains the nozzle lifts up from the sprinkler body when the sprinkler is operating and then retracts back below ground when not in use. Consider using pop-up style heads even in shrub areas. Pop-up sprinklers often don’t cost any more than shrub sprinklers when you include the cost of the riser (the upright pipe the sprinkler is mounted on). Two major advantages of pop-up sprinklers are safety and appearance.
What Pop-up Height Should You Use?
Pop-up style sprinklers are available in a variety of heights, generally 2″, 3″ , 4″ 6″ and 12″ are the common heights. Most of my commercial clients ask me to use at least a 6″ height, even for lawns. The extra height avoids problems. I wouldn’t use anything less than 4″ on fescue, rye, St. Augustine, or bluegrass lawns. For close mowed Bermuda grass 3″ will work. My experience is that the spray from 2″ pop-up heads are often blocked by even recently mowed grass! For that reason I do not recommend any model of 2″ pop-up, you will get dry spots in the lawn. For groundcover and shrubs use 6″ and 12″ heads.
Groundcover Design Trick:
Here’s a tip for watering a groundcover area next to a lawn. Place the sprinklers for the groundcover about 12″ away from the groundcover, in the lawn area, and aim them back at the groundcover. That way the groundcover does not block the spray as easily.
Shrub Style Sprinklers:
Shrub style sprinklers were a type of sprinkler head designed to be installed above ground on top of a pipe. In the old days they were used for shrub areas, thus the name. For liability reasons, most irrigation professionals no longer use shrub sprinklers, except in very limited situations where nothing else will work. You should take a hint from the pros and also avoid using them! Read the warning below! (For shrubs you really should look into using drip irrigation, it is a better choice than sprinklers for most situations.)
Metal or Plastic?
At the grocery store it’s “paper or plastic?” but with sprinklers the question becomes “metal or plastic?”. The conventional wisdom is that metal is more durable than plastic, and therefore is better. Up until the late 1970’s metal (usually brass, sometimes zinc) was the standard material from which almost all sprinklers were made. However, times have changed and now plastic is the most common material for sprinklers. Very few manufacturers even bother to make an all-metal sprinkler anymore. The primary reason for this change in materials is cost; machined metal parts are enormously expensive in comparison to injection molded plastic. Fortunately, most of today’s plastic sprinkler heads are very well engineered and will perform as well as, if not better than, the old metal sprinklers.
Hybrids: A few companies manufacture plastic sprinkler bodies which accept brass nozzles, which they claim results in a better water pattern. Other manufacturers claim that plastic nozzles perform as well as brass. The research tends to indicate that a really well-machined brass nozzle has better water distribution. But that’s laboratory tests, and in the real world a lot of other factors come into play. I personally haven’t noticed any significant difference in performance between most brass and plastic nozzles in well-designed, sprinkler systems, although brass nozzles will no doubt last longer. More importantly, there are a few nozzles, both brass and plastic, which don’t seem to perform as well as others. Fortunately, they are easily identified by comparing prices (as in “you get what you pay for.”) Typically these bad nozzles come pre-installed on sprinklers that don’t have the features I list below, so if you stick to sprinklers with my recommended features you will get acceptable quality nozzles.
Features to Look For:
The following features are common to all good-quality sprinkler heads (for both rotors and spray type heads.) Choosing a sprinkler without these features is asking for trouble.
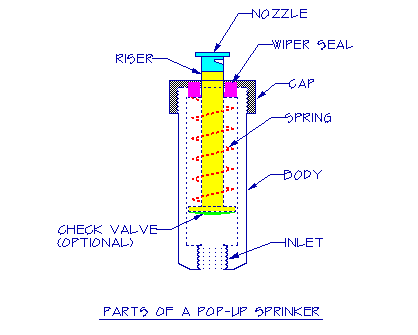
- Spring Retraction: Make sure a spring is used to pull the pop-up piston down into the case when the sprinkler isn’t on. As a general rule the stronger the spring, the less likely the piston will “stick up” and get mowed off. Stay away from sprinklers that rely only on gravity to retract the pop-up piston.
- Wiper Seal: This is a soft plastic seal around the pop-up riser stem that seals the riser so it won’t leak . The wiper seal also is responsible for keeping dirt out of the sprinkler body, and is the most important part in determining how long the sprinkler will last. Make sure the sprinkler model you select has a wiper seal. Note: on some sprinklers you must remove the sprinkler’s cap and look inside the bottom of it to see the seal. Be careful when removing the cap, on some models the spring will shoot out!
- 3 Inch Pop-Up Height (or higher): Unless you just like to trim grass around sprinkler heads, make sure the pop-up height is 3″ or more. This way the spray nozzle will clear the top of the grass. Most professionals use 4″ pop-up sprinklers in lawn areas, and 6″ or 12″ pop-ups in shrub areas.
- Rat Traps. This is a design type to avoid if you can. A “rat trap” is a derogatory name used in the sprinkler business to describe any sprinkler with a design that allows debris to fall into the sprinkler body when the riser is raised. The more proper name is a “bucket” style body, but I like the visual image of the problem that rat trap provides. The debris collects in the bucket area and eventually there is enough garbage in there to prevent the mechanism from dropping back down. The stuff that falls in there can get pretty ripe smelling as it decomposes, too! Do rats really get trapped in them? I’ve never seen one. The “trap” only opens when the sprinkler is operating and rats tend to stay away from a sprinkler that is operating! Mostly grass clippings and dirt get trapped.
- Please Call Us at Lancscape Services LLC of Tucson if you are in need of irrigation information
No comments:
Post a Comment